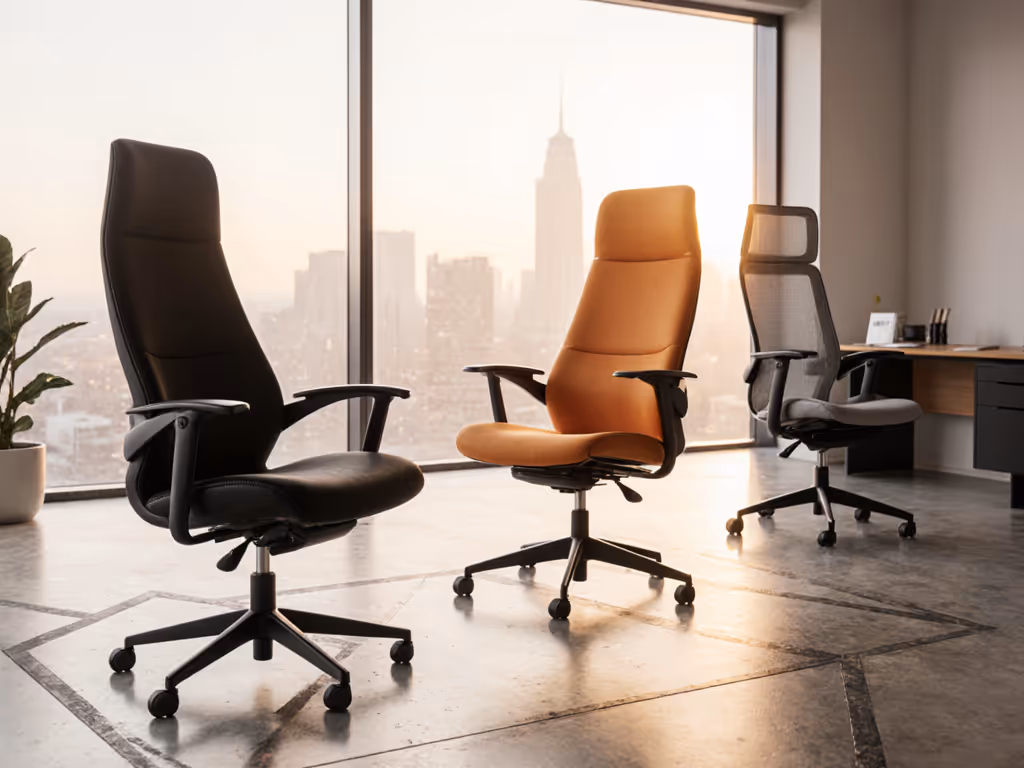
14 Adjustments: Branch Ergonomic Chair Done Right
By Owen McKay • 2nd Dec
When your Branch ergonomic chair feels like it's fighting you instead of supporting you, that's when productivity nosedives and discomfort spikes. As someone who's helped thousands dial in their office chair fit, I've seen how confusing those levers and dials can be, especially when you're already battling back pain after a long work session. The truth is, confidence with controls is half the battle; small tweaks compound into big comfort dividends. On a particularly hectic Monday rollout with twelve new hires and only twenty minutes to spare, we mapped just four key adjustments (thigh clearance, tilt tension, seat depth, and profile saves on cards). Two weeks later? Fewer break tickets and noticeably happier shoulders. That's when I committed to five-minute fit sessions that deliver compound benefits over time. Today, we'll tackle the Branch Ergonomic Chair's 14 adjustments in a stepwise, time-boxed approach designed for real people with real workdays.

Your Five-Minute Transformation: Mastering the Branch Chair's Adjustments
The magic of the Branch Ergonomic Chair isn't just in having 14 adjustment points, it is in knowing which ones matter most for your specific body and workstyle. Forget trying to tackle everything at once. We'll focus on accessible, high-impact tweaks that deliver immediate relief while building your control literacy. Set it, then move to the next step (no perfection required). For a full walkthrough of adjusting every feature, use our adjustable chair setup guide.
Group 1: The Foundation Adjustments (60 seconds)
Start with these non-negotiables that form your sitting foundation:
-
Seat Height: Plant feet flat on floor (or footrest), thighs parallel to ground. Time-boxed tip: Adjust while standing beside the chair, then sit to verify. Knees should align with hips or sit slightly lower.
-
Seat Depth: Leave 2 to 4 fingers between the seat edge and the back of your knees. Too deep? Thigh pressure builds. Too shallow? You lose lumbar contact. Friendly precision: Scoot forward until you feel your sit bones connect, then adjust depth accordingly.
-
Forward Seat Tilt: Often overlooked! A slight downward tilt (1 to 3°) shifts weight forward, reducing lower back pressure during focused tasks. Try it: Dial just enough to feel weight redistribute toward your feet without sliding forward.
Small fit tweaks compound into big comfort and focus dividends.
Group 2: Dynamic Support Adjustments (90 seconds)
These enable healthy movement throughout your workday: Learn movement strategies that pair with these adjustments in dynamic sitting techniques so your chair supports posture changes all day.
-
Tilt Tension: Match to your body weight, tighter for heavier users, looser for lighter frames. Test it: Recline slightly; you should feel resistance that supports your back without locking you rigid.
-
Tilt Lock: Four-stop mechanism lets you choose between fixed upright, slight recline, moderate recline, or full relaxation. Pro move: Use upright for focused work, moderate recline for calls.
-
Back Height: Align the top of lumbar support with your navel. Check: When sitting tall, the support should contact your lower back's natural curve.
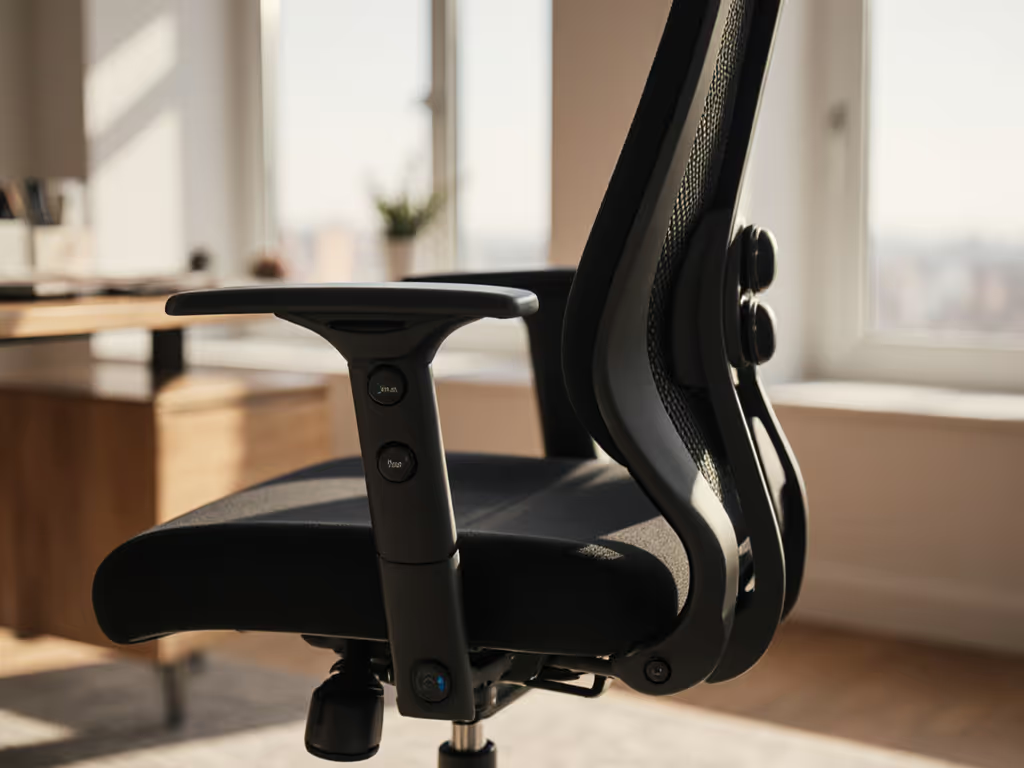
Group 3: Precision Armrest Adjustments (120 seconds)
The Branch 5D armrests are where Branch task chair technology shines, no more shoulder hiking or wrist strain: Not sure what '5D' really buys you? See our 4D vs 3D armrests comparison to understand adjustments that reduce shoulder strain.
-
Armrest Height: Elbows should rest at 90 to 110° when typing, shoulders relaxed. Verification: Make a fist; if your shoulders rise, lower the arms.
-
Armrest Width: Position pads so shoulders don't round forward. Test: Place hands on the keyboard; arms should form a natural "V" from your torso.
-
Pad Depth: Position so forearms rest fully without wrist bending. Rule of thumb: Pads should support ⅔ of forearm length.
-
Pad Width/Pivot: Rotate pads to match natural hand position (slight outward angle). Smaller adjustment, big impact: Reduces ulnar deviation during mousing.
Group 4: Personalized Comfort Adjustments (90 seconds)
Now customize for your unique physiology:
-
Lumbar Height: Slide support up or down to match your spine's curve. Tip: Place a rolled towel at your lumbar point first, then match the chair's position.
-
Lumbar Depth: Adjust firmness to provide support without pushing you forward. If lower-back pain persists, our lumbar support guide explains how proper support maintains your natural spine curve. Test: Breathe deeply (the lumbar should maintain contact during exhalation).
-
Seat Angle: Fine-tune the waterfall edge's effectiveness by adjusting the seat pan's pitch. Subtle win: A 5° downward tilt reduces tailbone pressure for petite users.
-
Caster Selection: Choose appropriate casters for your flooring (hard floor vs. carpet). Overlooked factor: Wrong casters create micro-movements that fatigue leg muscles over time.
Making It Stick: Your Action Plan
You don't need to master all 14 adjustments today. That's how people get overwhelmed and abandon the process. Instead, commit to this actionable next step: Pick just three adjustments that address your most pressing discomfort (likely seat height, depth, and tilt tension), set them using the time-boxed method above, and test them for 48 hours. Note how your body responds: less shoulder tension? Reduced lower back ache? That's your cue to add one more adjustment.
This approach embodies the ergonomic value proposition of the Branch chair: affordable ergonomic design that grows with your understanding. You're not buying a static piece of furniture; you're investing in a tool that evolves as your control literacy improves.
For those team leads managing multiple setups, remember my hectic Monday story: standardize on three baseline adjustments per role (e.g., developers vs. analysts), then let individuals personalize from there. That mid-range office seating sweet spot (where premium adjustability meets practical implementation) is where real productivity gains happen.
Set your first three adjustments now, then move to your next task with greater comfort. Your future self (sitting pain-free through that third Zoom meeting) will thank you.
Related Articles